
How to run a Jupyter notebook on a deepthought node
This blog post covers a couple of tips and tricks for setting up a jupyter notebook on a deepthought node, so you can leave it running and forget it.
There is a separate post for running jupyter on the head node, but this is a better way of getting it to work.
Thanks to Susie who gave me the code, but I think she got it from someone else (??)
Steps:
Installing Jupyter
This should be pretty straightforward:
mamba install -y -c conda-forge -n notebook_env jupyter-lab nb_conda_kernels
The gotcha that I ran into is that you should specify conda-forge because the version of jupyter-lab in the default conda channel uses Python 3.6 and is broken.
Note 1: I use notebook_env as the name, and that name appears in the slurm script below. If you use a different environment name, be sure to change it below
Note 2: We will use nb_conda_kernels later
Setting up a slurm script
I use this slurm script to run.
I submit this to the cluster like this:
mkdir -p jupyter # you only need to do this once!
sbatch slurm/jupyter_deepthought.slurm
It will put the log files in ~/jupyter and the notebooks by default will be whereever you run the sbatch command from.
It will also print a bunch of information into a log file in ~/jupyter that you will need.
For example, a recent run created this output:
Windows MobaXterm info
Forwarded port: 8100
Remote server: hpc-node003
Remote port: 8398
SSH server: deepthought.flinders.edu.au
SSH login: <your username>
SSH port: 22

Use a Browser on your local machine to go to:
localhost:8398  (prefix w/ https:// if using password)

If ypu have a command line, you can also use this version

ssh <your username>@deepthought.flinders.edu.au -p 22 -L 8100:hpc-node003:8398

and then open chrome and go to

https://localhost:8100


# There was some stuff here I deleted!
[I 2022-07-16 12:04:08.966 ServerApp] Serving notebooks from local directory: /home/edwa0468/jupyter
[I 2022-07-16 12:04:08.966 ServerApp] Jupyter Server 1.18.1 is running at:
[I 2022-07-16 12:04:08.966 ServerApp] http://hpc-node003:8398/lab?token=96baae5849d08890da8612e91b4fdf606cab3e1c1b1489d7
[I 2022-07-16 12:04:08.966 ServerApp]  or http://127.0.0.1:8398/lab?token=96baae5849d08890da8612e91b4fdf606cab3e1c1b1489d7
[I 2022-07-16 12:04:08.966 ServerApp] Use Control-C to stop this server and shut down all kernels (twice to skip confirmation).
[C 2022-07-16 12:04:08.981 ServerApp]

To access the server, open this file in a browser:
   file:///home/edwa0468/.local/share/jupyter/runtime/jpserver-1201005-open.html
Or copy and paste one of these URLs:
   http://hpc-node003:8398/lab?token=96baae5849d08890da8612e91b4fdf606cab3e1c1b1489d7
or http://127.0.0.1:8398/lab?token=96baae5849d08890da8612e91b4fdf606cab3e1c1b1489d7
You will need this information for setting up ssh tunneling described below.
ssh tunneling
Using mobaxterm
This is the easiest way to set it up on Windows. Click on the  icon to access the tunneling settings.
We are going to start a new local port forwarding option, and you can fill in the fields here:
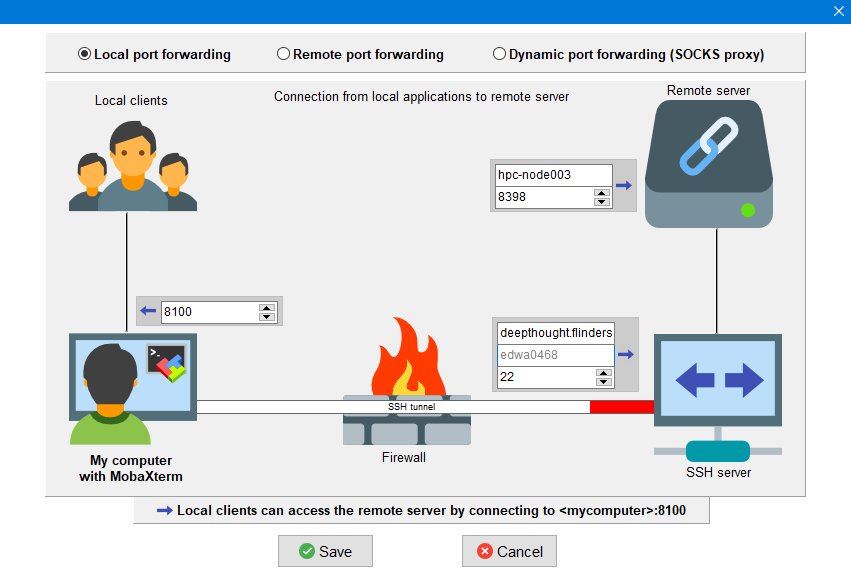
(click for a larger view)
Note 1: If you always set the local port to 8100 you never have to reset it. However if you have more than one jupter lab notebook running, you will need to set that to a different number on the next tunnel (e.g. 8101).
Note 2: Almost certainly your notebook will be running on a different port than 8398. You should use the port listed in the output as shown above.
Click save and then the  icon to start all the tunnels.
Now you can open up your web browser and connect to https://localhost:8100
Finally, copy and paste the token from the URLs listed in the output above to access the notebook.
Using ssh
If you have Windows Subsystem for Linux, Mac, Chromebook, or Linux (or even using your phone), you can set up an ssh tunnel from the command line.
Copy and paste the ssh line from the output:
ssh edwa0468@deepthought.flinders.edu.au -p 22 -L 8100:hpc-node003:8398
Note 1: make sure you use your username and ports, but you can leave the 22 alone.
This command means take local port 8100 and forward it to port 8398 on hpc-node003.
Now you can open up your web browser and connect to https://localhost:8100
Finally, copy and paste the token from the URLs listed in the output above to access the notebook.
Adding nb conda kernels
Recall at the beginning we installed nb_conda_kernels? You can access any of your conda environments by installing ipykernel:
conda activate bioinformatics
mamba install -y ipykernel
Now, when you click in the top right and choose to change your kernel, you will see your different conda environments available:
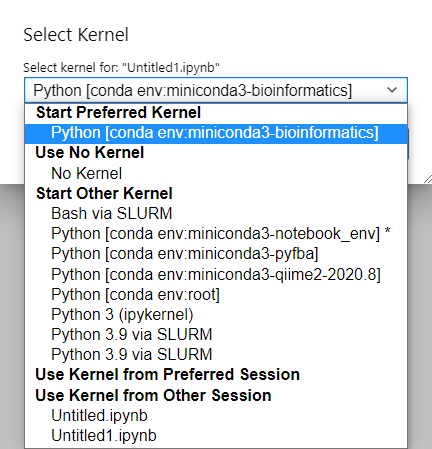
This means you can log into deepthought and set up a specific conda environment with the libraries you like, add ipykernel and choose it from this list.